Layout of Section 3
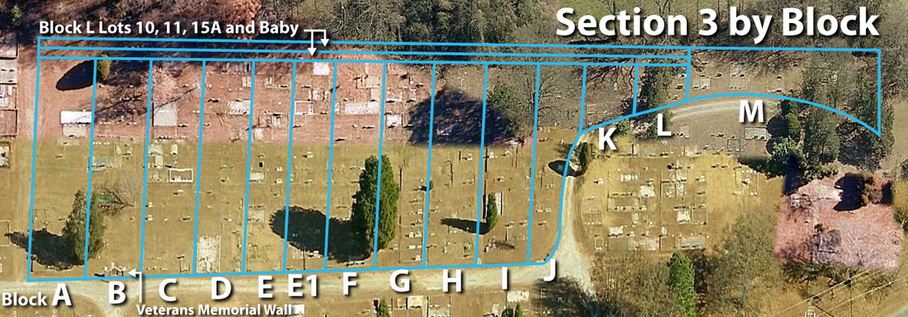
Section 3 is bordered on the east by a fence, on the west by driveways, on the north by a grassy strip of land about 20 feet wide with no graves in it, and on the south by the end of the property. The Hillcrest Veterans Memorial Wall is at the front of Section 3, Block B, and faces what we call the main entrance driveway (labeled as entry D on our main aerial map).
Most lots in Section 3 are 6 graves wide, but this varies. Space numbers within lots in this section begin at the grassy walkway between each block, So in the diagram below, the space numbers for lots 1 and 36 are as follows:
LOT 1> 1 - 2 - 3 - 4 - 5 - 6 | 6 - 5 - 4 - 3 - 2 - 1 <Lot 36
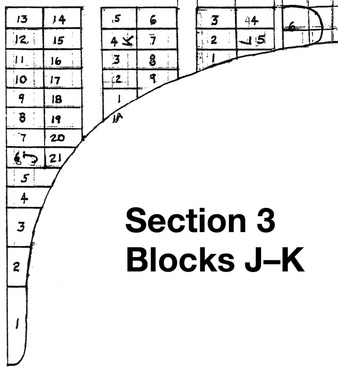
A copy of the original plat map of this section is included below.
Notes about each block of Section 3

Note: The diagram to the left applies generally to blocks A–I. Exceptions are noted below.
Block A: There is a wide grassy strip, sometimes used by service companies to check monitoring wells, between Block 1 of Section 1 and Block A of Section 2. The front (driveway end) of block 1 begins with the Byram headstone in Lot 1, along with some cedar trees.
Block B: The Hillcrest Veterans Memorial Wall is located in front of Block B. The Denham and Brown family markers are behind it in Block B, Lot 36.
Block C: The Rogers and Childers markers are near the front of Block C.
Block D: The Bowers and Smith markers are near the front of Block D.
Block E: The Hyatt marker is near the front of Block E (readable from other side).
Block E1: The Waters and Vaughn markers are near the front of Block E1. (We're not sure why they numbered it this way)
Block F: The Yancey and Parker markers are near the front of Block F. Three large cedar trees are in this block and the walkway between F and G.
Block G: There is a flat marker for Jenkins at the front of this block, and Quinn and Roberts markers a little farther back and more visible. A slab of concrete spans the front of the walkway between Blocks G and H.
Block H: Markers near the front of Block H include Clark (visible from driveway), Valentine, Sutton and Longino. A slab of concrete spans the front of the walkway between Blocks H and I.
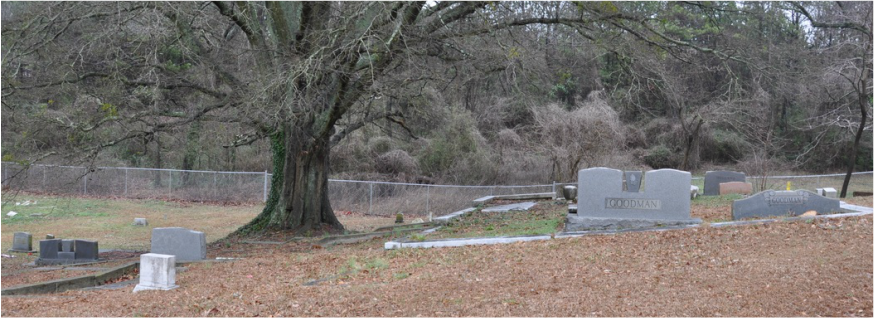
Block I: The front of block I is mostly small markers for a group of children. Behind these are markers for Bagwell, Vickery, and (further back ) Whatley. The huge oak tree (see photo) that defines this area is near the back of this block, extending into the walkway between blocks I and J.

Block J: This block begins the curve along the driveway at the top of the hill, which goes around the Circle Section, and the layout changes according to the old plat map shown at left. At the front you can see the Johnston marker in Lot 1. The notable Goodman lot (see photo) which comprises Lot 20 and a couple adjacent lots, is helpful to note when viewing this area.
Block K: This small block along the back of the Circle Driveway includes a visible Saunders and Dover markers.
Block L (Lots 1–6): This part of Block L, also along the back driveway of the Circle Section, includes a marker for Odom.
Block L (Lots 10, 11, 15A and Baby): This area needs more research for us to put anything definitive in writing, but basically it is comprised of two long rows of burials along the back fence of Section 3, from behind the original part of Block L to the back of Block 1. Generally, 15A is close to 1–6. 10 and 11 are one of the long rows of mostly individual, sequential burials. Baby is the other long row. This is one of several areas named "Baby" or "Babyland" on the maps. As these were generally used for individual burials for families without a family lot, they are generally sequential, but most do not have markers.
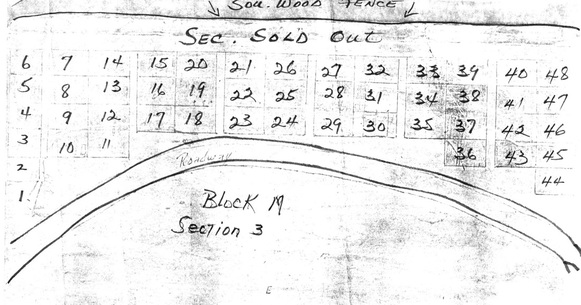
Block M: This section, added to maps after the original plat. A rough diagram is included below. Apparently 1–7 were not used as marked, as we have no listed burials there. For reference: The Renfroe marker is in lot 9, the Cash marker is in lot 22, the Langley marker is in lot 30, and the Wright marker is in lot 43.


